mass-migrating modules inside an Ansible Collection

In the Foreman project, we've been maintaining a collection of Ansible modules to manage Foreman installations since 2017. That is, 2 years before Ansible had the concept of collections at all.

For that you had to set library (and later module_utils and doc_fragment_plugins) in ansible.cfg and effectively inject our modules, their helpers and documentation fragments into the main Ansible namespace. Not the cleanest solution, but it worked quiet well for us.

When Ansible started introducing Collections, we quickly joined, as the idea of namespaced, easily distributable and usable content units was great and exactly matched what we had in mind.

However, collections are only usable in Ansible 2.8, or actually 2.9 as 2.8 can consume them, but tooling around building and installing them is lacking. Because of that we've been keeping our modules usable outside of a collection.

Until recently, when we decided it's time to move on, drop that compatibility (which costed a few headaches over the time) and release a shiny 1.0.0.

One of the changes we wanted for 1.0.0 is renaming a few modules. Historically we had the module names prefixed with foreman_ and katello_, depending whether they were designed to work with Foreman (and plugins) or Katello (which is technically a Foreman plugin, but has a way more complicated deployment and currently can't be easily added to an existing Foreman setup). This made sense as long as we were injecting into the main Ansible namespace, but with collections the names be became theforeman.foreman.foreman_ <something> and while we all love Foreman, that was a bit too much. So we wanted to drop that prefix. And while at it, also change some other names (like ptable, which became partition_table) to be more readable.

But how? There is no tooling that would rename all files accordingly, adjust examples and tests. Well, bash to the rescue! I'm usually not a big fan of bash scripts, but renaming files, searching and replacing strings? That perfectly fits!

First of all we need a way map the old name to the new name. In most cases it's just "drop the prefix", for the others you can have some if/elif/fi:

prefixless_name=$(echo ${old_name}| sed -E 's/^(foreman|katello)_//')
if [[ ${old_name} == 'foreman_environment' ]]; then
  new_name='puppet_environment'
elif [[ ${old_name} == 'katello_sync' ]]; then
  new_name='repository_sync'
elif [[ ${old_name} == 'katello_upload' ]]; then
  new_name='content_upload'
elif [[ ${old_name} == 'foreman_ptable' ]]; then
  new_name='partition_table'
elif [[ ${old_name} == 'foreman_search_facts' ]]; then
  new_name='resource_info'
elif [[ ${old_name} == 'katello_manifest' ]]; then
  new_name='subscription_manifest'
elif [[ ${old_name} == 'foreman_model' ]]; then
  new_name='hardware_model'
else
  new_name=${prefixless_name}
fi

That defined, we need to actually have a ${old_name}. Well, that's a for loop over the modules, right?

for module in ${BASE}/foreman_*py ${BASE}/katello_*py; do
  old_name=$(basename ${module} .py)
  done

While we're looping over files, let's rename them and all the files that are associated with the module:

# rename the module
git mv ${BASE}/${old_name}.py ${BASE}/${new_name}.py

# rename the tests and test fixtures
git mv ${TESTS}/${old_name}.yml ${TESTS}/${new_name}.yml
git mv tests/fixtures/apidoc/${old_name}.json tests/fixtures/apidoc/${new_name}.json
for testfile in ${TESTS}/fixtures/${old_name}-*.yml; do
  git mv ${testfile} $(echo ${testfile}| sed "s/${old_name}/${new_name}/")
done

Now comes the really tricky part: search and replace. Let's see where we need to replace first:

  1. in the module file
    1. module key of the DOCUMENTATION stanza (e.g. module: foreman_example)
    2. all examples (e.g. foreman_example: …)
  2. in all test playbooks (e.g. foreman_example: …)
  3. in pytest's conftest.py and other files related to test execution
  4. in documentation
sed -E -i "/^(\s+${old_name}|module):/ s/${old_name}/${new_name}/g" ${BASE}/*.py

sed -E -i "/^(\s+${old_name}|module):/ s/${old_name}/${new_name}/g" tests/test_playbooks/tasks/*.yml tests/test_playbooks/*.yml

sed -E -i "/'${old_name}'/ s/${old_name}/${new_name}/" tests/conftest.py tests/test_crud.py

sed -E -i "/`${old_name}`/ s/${old_name}/${new_name}/g' README.md docs/*.md

You've probably noticed I used ${BASE} and ${TESTS} and never defined them… Lazy me.

But here is the full script, defining the variables and looping over all the modules.

#!/bin/bash

BASE=plugins/modules
TESTS=tests/test_playbooks
RUNTIME=meta/runtime.yml

echo "plugin_routing:" > ${RUNTIME}
echo "  modules:" >> ${RUNTIME}

for module in ${BASE}/foreman_*py ${BASE}/katello_*py; do
  old_name=$(basename ${module} .py)
  prefixless_name=$(echo ${old_name}| sed -E 's/^(foreman|katello)_//')
  if [[ ${old_name} == 'foreman_environment' ]]; then
    new_name='puppet_environment'
  elif [[ ${old_name} == 'katello_sync' ]]; then
    new_name='repository_sync'
  elif [[ ${old_name} == 'katello_upload' ]]; then
    new_name='content_upload'
  elif [[ ${old_name} == 'foreman_ptable' ]]; then
    new_name='partition_table'
  elif [[ ${old_name} == 'foreman_search_facts' ]]; then
    new_name='resource_info'
  elif [[ ${old_name} == 'katello_manifest' ]]; then
    new_name='subscription_manifest'
  elif [[ ${old_name} == 'foreman_model' ]]; then
    new_name='hardware_model'
  else
    new_name=${prefixless_name}
  fi

  echo "renaming ${old_name} to ${new_name}"

  git mv ${BASE}/${old_name}.py ${BASE}/${new_name}.py

  git mv ${TESTS}/${old_name}.yml ${TESTS}/${new_name}.yml
  git mv tests/fixtures/apidoc/${old_name}.json tests/fixtures/apidoc/${new_name}.json
  for testfile in ${TESTS}/fixtures/${old_name}-*.yml; do
    git mv ${testfile} $(echo ${testfile}| sed "s/${old_name}/${new_name}/")
  done

  sed -E -i "/^(\s+${old_name}|module):/ s/${old_name}/${new_name}/g" ${BASE}/*.py

  sed -E -i "/^(\s+${old_name}|module):/ s/${old_name}/${new_name}/g" tests/test_playbooks/tasks/*.yml tests/test_playbooks/*.yml

  sed -E -i "/'${old_name}'/ s/${old_name}/${new_name}/" tests/conftest.py tests/test_crud.py

  sed -E -i "/`${old_name}`/ s/${old_name}/${new_name}/g' README.md docs/*.md

  echo "    ${old_name}:" >> ${RUNTIME}
  echo "      redirect: ${new_name}" >> ${RUNTIME}

  git commit -m "rename ${old_name} to ${new_name}" ${BASE} tests/ README.md docs/ ${RUNTIME}
done

As a bonus, the script will also generate a meta/runtime.yml which can be used by Ansible 2.10+ to automatically use the new module names if the playbook contains the old ones.

Oh, and yes, this is probably not the nicest script you'll read this year. Maybe not even today. But it got the job nicely done and I don't intend to need it again anyways.

naked pings 2020

ajax' post about "ping" etiquette is over 10 years old, but holds true until this day. So true, that my IRC client at work has a script, that will reply with a link to it each time I get a naked ping.

But IRC is not the only means of communication. There is also mail, (video) conferencing, and GitHub/GitLab. Well, at least in the software engineering context. Oh and yes, it's 2020 and I still (proudly) have no Slack account.

Thankfully, (naked) pings are not really a thing for mail or conferencing, but I see an increasing amount of them on GitHub and it bothers me, a lot. As there is no direct messaging on GitHub, you might rightfully ask why, as there is always context in form of the issue or PR the ping happened in, so lean back an listen ;-)

notifications become useless

While there might be context in the issue/PR, there is none (besides the title) in the notification mail, and not even the title in the notification from the Android app (which I have installed as I use it lot for smaller reviews). So the ping will always force a full context switch to open the web view of the issue in question, removing the possibility to just swipe away the notification/mail as "not important right now".

even some context is not enough context

Even after visiting the issue/PR, the ping quite often remains non-actionable. Do you want me to debug/fix the issue? Review the PR? Merge it? Close it? I don't know!

The only actionable ping is when the previous message is directed at me and has an actionable request in it and the ping is just a reminder that I have to do it. And even then, why not write "hey @evgeni, did you have time to process my last question?" or something similar?

BTW, this is also what I dislike about ajax' minimal example "ping re bz 534027" - what am I supposed to do with that BZ?!

why me anyways?!

Unless I am the only maintainer of a repo or the author of the issue/PR, there is usually no reason to ping me directly. I might be sick, or on holiday, or currently not working on that particular repo/topic or whatever. Any of that will result in you thinking that your request will be prioritized, while in reality it won't. Even worse, somebody might come across it, see me mentioned and think "ok, that's Evgeni's playground, I'll look elsewhere".

Most organizations have groups of people working on specific topics. If you know the group name and have enough permissions (I am not exactly sure which, just that GitHub have limits to avoid spam, sorry) you can ping @organization/group and everyone in that group will get a notification. That's far from perfect, but at least this will get the attention of the right people. Sometimes there is also a bot that will either automatically ping a group of people or you can trigger to do so.

Oh, and I'm getting paid for work on open source. So if you end up pinging me in a work-related repository, there is a high chance I will only process that during work hours, while another co-worker might have been available to help you out almost immediately.

be patient

Unless we talked on another medium before and I am waiting for it, please don't ping directly after creation of the issue/PR. Maintainers get notifications about new stuff and will triage and process it at some point.

conclusion

If you feel called out, please don't take it personally. Instead, please try to provide as much actionable information as possible and be patient, that's the best way to get a high quality result.

I will ignore pings where I don't immediately know what to do, and so should you.

one more thing

Oh, and if you ping me on IRC, with context, and then disconnect before I can respond…

In the past you would sometimes get a reply by mail. These days the request will be most probably ignored. I don't like talking to the void. Sorry.

show your desk

Some days ago I posted a picture of my desk on Mastodon and Twitter.

standing desk with a monitor, laptop etc

After that I got multiple questions about the setup, so I thought "Michael and Michael did posts about their setups, you could too!"

And well, here we are ;-)

desk

The desk is a Flexispot E5B frame with a 200×80×2.6cm oak table top.

The Flexispot E5 (the B stands for black) is a rather cheap (as in not expensive) standing desk frame. It has a retail price of 379€, but you can often get it as low as 299€ on sale.

Add a nice table top from a local store (mine was like 99€), a bit of wood oil and work and you get a nice standing desk for less than 500€.

The frame has three memory positions, but I only use two: one for sitting, one for standing, and a "change position" timer that I never used so far.

The table top has a bit of a swing when in standing position (mine is at 104cm according to the electronics in the table), but not enough to disturb typing on the keyboard or thinking. I certainly wouldn't place a sewing machine up there, but that was not a requirement anyways ;)

To compare: the IKEA Bekant table has a similar, maybe even slightly stronger swing.

chair

Speaking of IKEA… The chair is an IKEA Volmar. They don't seem to sell it since mid 2019 anymore though, so no link here.

hardware

laptop

A Lenovo ThinkPad T480s, i7-8650U, 24GB RAM, running Fedora 32 Workstation. Just enough power while not too big and heavy. Full of stickers, because I ♥ stickers!

It's connected to a Lenovo ThinkPad Thunderbolt 3 Dock (Gen 1). After 2 years with that thing, I'm still not sure what to think about it, as I had various issues with it over the time:

  • the internal USB hub just vanishing from existence until a full power cycle of the dock was performed, but that might have been caused by my USB-switch which I recently removed.
  • the NIC negotiating at 100MBit/s instead of 1000MBit/s and then keeping on re-negotiating every few minutes, disconnecting me from the network, but I've not seen that since the Fedora 32 upgrade.
  • the USB-attached keyboard not working during boot as it needs some Thunderbolt magic.

The ThinkPad stands on a Adam Hall Stands SLT001E, a rather simple stand for laptops and other equipment (primarily made for DJs I think). The Dock fits exactly between the two feet of the stand, so that is nice and saves space on the table. Using the stand I can use the laptop screen as a second screen when I want it - but most often I do not and have the laptop lid closed while working.

workstation

A Lenovo ThinkStation P410, Xeon E5-2620 v4, 96GB RAM, running Fedora 32 Workstation. That's my VM playground. Having lots of RAM really helps if you need/want to run many VMs with Foreman/Katello or Red Hat Satellite as they tend to be a bit memory hungry and throwing hardware at problems tend to be an easy solution for many of them.

The ThinkStation is also connected to the monitor, and I used to have an USB switch to flip my keyboard, mouse and Yubikey from the laptop to the workstation and back. But as noted above, this switch somehow made the USB hub in the laptop dock unhappy (maybe because I was switching too quickly after resume or so), so it's currently removed from the setup and I use the workstation via SSH only.

It's mounted under the table using a ROLINE PC holder. You won't get any design awards with it, but it's easy to assemble and allows the computer to move with the table, minimizing the number of cables that need to have a flexible length.

monitor

The monitor is an older Dell UltraSharp U2515H - a 25" 2560×1440 model. It sits on an Amazon Basics Monitor Arm (which is identical to an Ergotron LX to the best of my knowledge) and is accompanied by a Dell AC511 soundbar.

I don't use the adjustable arm much. It's from the time I had no real standing desk and would use the arm and a cardboard box to lift the monitor and keyboard to a standing level. If you don't want to invest in a standing desk, that's the best and cheapest solution!

The soundbar is sufficient for listening to music while working and for chatting with colleagues.

webcam

A Logitech C920 Pro, what else?

Works perfectly under Linux with the UVC driver and has rather good microphones. Actually, so good that I never use a headset during video calls and so far nobody complained about bad audio.

keyboard

A ThinkPad Compact USB Keyboard with TrackPoint. The keyboard matches the one in my T480s, so my brain doesn't have to switch. It was awful when I still had the "old" model and had to switch between the two.

UK layout. Sue me. I like the big return key.

mouse

A Logitech MX Master 2.

I got the MX Revolution as a gift a long time ago, and at first I was like: WTF, why would anyone pay hundred bucks for a mouse?! Well, after some time I knew, it's just that good. And when it was time to get a new one (the rubber coating gets all slippery after some time) the decision was rather easy.

I'm pondering if I should try the MX Ergo or the MX Vertical at some point, but not enough to go and buy one of them yet.

other

notepad

I'm terrible at remembering things, so I need to write them down. And I'm terrible at remembering to look at my notes, so they need to be in my view. So there is a regular A5 notepad on my desk, that gets filled with check boxes and stuff, page after page.

coaster

It's a wooden table, you don't want to have liquids on it, right? Thankfully a friend of mine once made coasters out of old Xeon CPUs and epoxy. He gave me one in exchange for a busted X41 ThinkPad. I still think I made the better deal ;)

yubikey

Keep your secrets safe! Mine is used as a GnuPG smart card for both encryption and SSH authentication, U2F on various pages and 2FA for VPN.

headphones

I own a pair of Bose QuietComfort 25 with an aftermarket Bluetooth adapter and Anker SoundBuds Slim+. Both are used rather seldomly while working, as my office is usually quiet and no one is disturbed when I listen to music without headphones.

what's missing?

light

I want to add more light to the setup, noth to have a better picture during video calls but also to have better light when doing something else on the table - like soldering. The plan is to add an IKEA Tertial with some Trådfri smart LED in it, but the Tertial is currently not available for delivery at IKEA and I'm not going to visit one in the current situation.

bigger monitor

Currently pondering getting a bigger (27+ inch) 4K monitor. Still can't really decide which one to get. There are so many, and they all differ in some way. But it seems no affordable one is offering an integrated USB switch and sufficient amount of USB ports, so I'll probably get whatever can get me a good picture without any extra features at a reasonable price.

Changing the monitor will probably also mean rethinking the sound output, as I'm sure mounting the Dell soundbar to anything but the designated 5 year old monitor won't work too well.

Building a Shelly 2.5 USB to TTL adapter cable

When you want to flash your Shelly 2.5 with anything but the original firmware for the first time, you'll need to attach it to your computer. Later flashes can happen over the air (at least with ESPHome or Tasmota), but the first one cannot.

In theory, this is not a problem as the Shelly has a quite exposed and well documented interface:

Shelly 2.5 pinout

However, on closer inspection you'll notice that your normal jumper wires don't fit as the Shelly has a connector with 1.27mm (0.05in) pitch and 1mm diameter holes.

Now, there are various tutorials on the Internet how to build a compatible connector using Ethernet cables and hot glue or with female header socket legs, and you can even buy cables on Amazon for 18€! But 18€ sounded like a lot and the female header socket thing while working was pretty finicky to use, so I decided to build something different.

We'll need 6 female-to-female jumper wires and a 1.27mm pitch male header. Jumper wires I had at home, the header I got is a SL 1X20G 1,27 from reichelt.de for 0.61€. It's a 20 pin one, so we can make 3 adapters out of it if needed. Oh and we'll need some isolation tape.

SL 1X20G 1,27

The first step is to cut the header into 6 pin chunks. Make sure not to cut too close to the 6th pin as the whole thing is rather fragile and you might lose it.

SL 1X20G 1,27 cut into pieces

It now fits very well into the Shelly with the longer side of the pins.

Shelly 2.5 with pin headers attached

Second step is to strip the plastic part of one side of the jumper wires. Those are designed to fit 2.54mm pitch headers and won't work for our use case otherwise.

jumper wire with removed plastic

As the connectors are still too big, even after removing the plastic, the next step is to take some pliers and gently press the connectors until they fit the smaller pins of our header.

Shelly 2.5 with pin headers and a jumper wire attached

Now is the time to put everything together. To avoid short circuiting the pins/connectors, apply some isolation tape while assembling, but not too much as the space is really limited.

Shelly 2.5 with pin headers and a jumper wire attached and taped

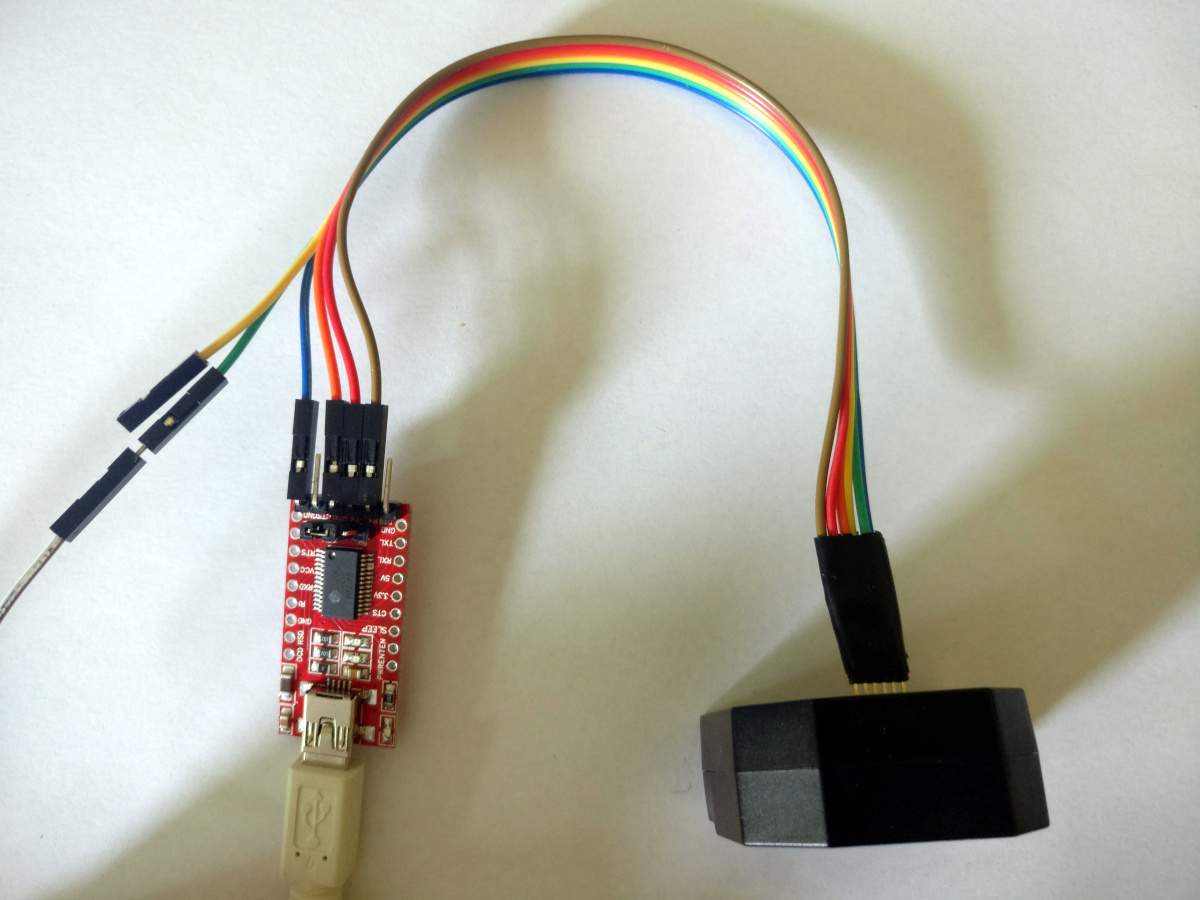
And we're done, a wonderful (lol) and working (yay) Shelly 2.5 cable that can be attached to any USB-TTL adapter, like the pictured FTDI clone you get almost everywhere.

Shelly 2.5 with full cable and FTDI attached

Yes, in an ideal world we would have soldered the header to the cable, but I didn't feel like soldering on that limited space. And yes, shrink-wrap might be a good thing too, but again, limited space and with isolation tape you only need one layer between two pins, not two.

Remote management for OpenWRT devices without opening inbound connections

Everyone is working from home these days and needs a decent Internet connection. That's especially true if you need to do video calls and the room you want to do them has the worst WiFi coverage of the whole flat. Well, that's exactly what happened to my parents in law.

When they moved in, we knew that at some point we'll have to fix the WiFi - the ISP provided DSL/router/WiFi combo would not cut it, especially not with the shape of the flat and the elevator shaft in the middle of it: the flat is essentially a big C around said shaft. But it was good enough for email, so we postponed that. Until now.

The flat has wired Ethernet, but the users MacBook Air does not. That would have been too easy, right? So let's add another access point and hope the situation improves.

Luckily I still had a TP-Link Archer C7 AC1750 in a drawer, which I could quickly flash with a fresh OpenWRT release, disable DHCPd and configure the same SSID and keys as the main/old WiFi. But I didn't know which channels would be best in the destination environment.

Under normal circumstances, I'd just take the AP, drive to my parents in law and finish the configuration there. Nope, not gonna happen these days. So my plan was to finish configuration here, put the AP in a box and on the porch where someone can pick it up.

But this would leave me without a way to further configure the device once it has been deployed - I was not particularly interested in trying to get port forwarding configured via phone and I was pretty sure UPnP was disabled in the ISP router. Installing a Tor hidden service for SSH was one possibility, setting up a VPN and making the AP a client another. Well, or just creating a reverse tunnel with SSH!

sshtunnel

Creating a tunnel with OpenSSH is easy: ssh -R127.0.0.1:2222:127.0.0.1:22 server.example.com will forward localhost:2222 on server.example.com to port 22 of the machine the SSH connection originated from. But what happens if the connection dies? Adding a while true; do …; done around it might help, but I would really like not to reinvent the wheel here!

Thankfully, somebody already invented that particular wheel and OpenWRT comes with a sshtunnel package that takes care of setting up and keeping up such tunnels and documentation how to do so. Just install the sshtunnel package, edit /etc/config/sshtunnel to contain a server stanza with hostname, port and username and a tunnelR stanza referring said server plus the local and remote sides of the tunnel and you're good to go.

config server home
  option user     user
  option hostname server.example.com
  option port     22

config tunnelR local_ssh
  option server         home
  option remoteaddress  127.0.0.1
  option remoteport     2222
  option localaddress   127.0.0.1
  option localport      22

The only caveat is that sshtunnel needs the OpenSSH client binary (and the package correctly depends on it) and OpenWRT does not ship the ssh-keygen tool from OpenSSH but only the equivalent for Dropbear. As OpenSSH can't read Dropbear keys (and vice versa) you'll have to generate the key somewhere else and deploy it to the OpenWRT box and the target system.

Oh, and OpenWRT defaults to enabling password login via SSH, so please disable that if you expose the box to the Internet in any way!

Using the tunnel

After configuring and starting the service, you'll see the OpenWRT system logging in to the configured remote and opening the tunnel. For some reason that connection would not show up in the output of w -- probably because there was no shell started or something, but logs show it clearly.

Now it's just a matter of connecting to the newly open port and you're in. As the port is bound to 127.0.0.1, the connection is only possible from server.example.com or using it as a jump host via OpenSSH's ProxyJump option: ssh -J server.example.com -p 2222 root@localhost.

Additionally, you can forward a local port over the tunneled connection to create a tunnel for the OpenWRT webinterface: ssh -J server.example.com -p 2222 -L8080:localhost:80 root@localhost. Yes, that's a tunnel inside a tunnel, and all the network engineers will go brrr, but it works and you can access LuCi on http://localhost:8080 just fine.

If you don't want to type that every time, create an entry in your .ssh/config:

Host openwrt
  ProxyJump server.example.com
  HostName localhost
  Port 2222
  User root
  LocalForward 8080 localhost:80

And we're done. Enjoy easy access to the newly deployed box and carry on.

Controlling roller shutters using a Shelly 2.5, ESPHome and Home Assistant

Our house has roller shutters on all windows and most of them have an electric motor to open and close them. The motors are Schellenberg shaft motors (not sure this is the right English term), that you can configure end positions for and then by applying current to the right pair of pins they move the shutters up and down until the current is removed or one of the endstops is reached. As the motors were installed over a long period of time, the attached control units varied in functionality: different ways to program open/close times, with and without battery for the clock/settings etc, but they all had something in common: no central management and pretty ugly. We decided to replace those control units with regular 2 gang light switches that match the other switches in the house. And as we didn't want to lose the automatic open/close timer, we had to add some smarts to it.

Shelly 2.5 and ESPHome

Say hello to Shelly 2.5! The Shelly 2.5 is an ESP8266 with two relays attached to it in a super tiny package you can hide in the wall behind a regular switch. Pretty nifty. It originally comes with a Mongoose OS based firmware and an own app, but ain't nobody needs that, especially nobody who wants to implement some crude logic. That said, the original firmware isn't bad. It has a no-cloud mode, a REST API and does support MQTT for integration into Home Assistant and others.

My ESP firmware of choice is ESPHome, which you can flash easily onto a Shelly (no matter 1, 2 or 2.5) using a USB TTL adapter that provides 3.3V. Home Assistant has native ESPHome support with auto-discovery, which is much nicer than manually attaching things to MQTT topics.

To get ESPHome compiled for the Shelly 2.5, we'll need a basic configuration like this:

esphome:
  name: shelly25
  platform: ESP8266
  board: modwifi
  arduino_version: 2.4.2

We're using board: modwifi as the Shelly 2.5 (and all other Shellys) has 2MB flash and the usually recommended esp01_1m would only use 1MB of that - otherwise the configurations are identical (see the PlatformIO entries for modwifi and esp01_1m). And arduino_version: 2.4.2 is what the Internet suggests is the most stable SDK version, and who will argue with the Internet?!

Now an ESP8266 without network connection is boring, so we add a WiFi configuration:

wifi:
  ssid: !secret wifi_ssid
  password: !secret wifi_password
  power_save_mode: none

The !secret commands load the named variables from secrets.yaml. While testing, I found the network connection of the Shelly very unreliable, especially when placed inside the wall and thus having rather bad bad reception (-75dBm according to ESPHome). However, setting power_save_mode: none explicitly seems to have fixed this, even if NONE is supposed to be the default on ESP8266.

At this point the Shelly has a working firmware and WiFi, but does not expose any of its features: no switches, no relays, no power meters.

To fix that we first need to find out the GPIO pins all these are connected to. Thankfully we can basically copy paste the definition from the Tasmota (another open-source firmware for ESPs) template:

pin_led1: GPIO0
pin_button1: GPIO2
pin_relay1: GPIO4
pin_switch2n: GPIO5
pin_sda: GPIO12
pin_switch1n: GPIO13
pin_scl: GPIO14
pin_relay2: GPIO15
pin_ade7953: GPIO16
pin_temp: A0

If we place that into the substitutions section of the ESPHome config, we can use the names everywhere and don't have to remember the pin numbers.

The configuration for the ADE7953 power sensor and the NTC temperature sensor are taken verbatim from the ESPHome documentation, so there is no need to repeat them here.

The configuration for the switches and relays are also rather straight forward:

binary_sensor:
  - platform: gpio
    pin: ${pin_switch1n}
    name: "Switch #1"
    internal: true
    id: switch1

  - platform: gpio
    pin: ${pin_switch2n}
    name: "Switch #2"
    internal: true
    id: switch2

switch:
  - platform: gpio
    pin: ${pin_relay1}
    name: "Relay #1"
    internal: true
    id: relay1
    interlock: &interlock_group [relay1, relay2]

  - platform: gpio
    pin: ${pin_relay2}
    name: "Relay #2"
    internal: true
    id: relay2
    interlock: *interlock_group

All marked as internal: true, as we don't need them visible in Home Assistant.

ESPHome and Schellenberg roller shutters

Now that we have a working Shelly 2.5 with ESPHome, how do we control Schellenberg (and other) roller shutters with it?

Well, first of all we need to connect the Up and Down wires of the shutter motor to the two relays of the Shelly. And if they would not be marked as internal: true, they would show up in Home Assistant and we would be able to flip them on and off, moving the shutters. But this would also mean that we need to flip them off each time after use, as while the motor knows when to stop and will do so, applying current to both wires at the same time produces rather interesting results. So instead of fiddling around with the relays directly, we define a time-based cover in our configuration:

cover:
  - platform: time_based
    name: "${location} Rolladen"
    id: rolladen

    open_action:
      - switch.turn_on: relay2
    open_duration: ${open_duration}

    close_action:
      - switch.turn_on: relay1
    close_duration: ${close_duration}

    stop_action:
      - switch.turn_off: relay1
      - switch.turn_off: relay2

We use a time-based cover because that's the easiest thing that will also turn the relays off for us after the shutters have been opened/closed, as the motor does not "report" any state back. We could use the integrated power meter of the Shelly to turn off when the load falls under a threshold, but I was too lazy and this works just fine as it is.

Next, let's add the physical switches to it. We could just add on_press automations to the binary GPIO sensors we configured for the two switch inputs the Shelly has. But if you have kids at home, you'll know that they like to press ALL THE THINGS and what could be better than a small kill-switch against small fingers?

switch:
  [ previous definitions go here ]

  - platform: template
    id: block_control
    name: "${location} Block Control"
    optimistic: true

  - platform: template
    name: "Move UP"
    internal: true
    lambda: |-
      if (id(switch1).state && !id(block_control).state) {
        return true;
      } else {
        return false;
      }
    on_turn_on:
      then:
        cover.open: rolladen
    on_turn_off:
      then:
        cover.stop: rolladen

  - platform: template
    name: "Move DOWN"
    internal: true
    lambda: |-
      if (id(switch2).state && !id(block_control).state) {
        return true;
      } else {
        return false;
      }
    on_turn_on:
      then:
        cover.close: rolladen
    on_turn_off:
      then:
        cover.stop: rolladen

This adds three more template switches. The first one, "Block Control", is exposed to Home Assistant, has no lambda definition and is set to optimistic: true, which makes is basically a dumb switch that can be flipped at will and the only thing it does is storing the binary on/off state. The two others are almost identical. The name differs, obviously, and so does the on_turn_on automation (one triggers the cover to open, the other to close). And the really interesting part is the lambda that monitors one of the physical switches and if that is turned on, plus "Block Control" is off, reports the switch as turned on, thus triggering the automation. With this we can now block the physical switches via Home Assistant, while still being able to control the shutters via the same.

All this (and a bit more) can be found in my esphome-configs repository on GitHub, enjoy!

Not-So-Self-Hosting

I planned to write about this for quite some time now (last time end of April), and now, thanks to the GitHub acquisition by Microsoft and all that #movingtogitlab traffic, I am finally sitting here and writing these lines.

This post is not about Microsoft, GitHub or GitLab, and it's neither about any other SaaS solution out there, the named companies and products are just examples. It's more about "do you really want to self-host?"

Every time a big company acquires, shuts down or changes an online service (SaaS - Software as a Service), you hear people say "told you so, you should better have self-hosted from the beginning". And while I do run quite a lot of own infrastructure, I think this statement is too general and does not work well for many users out there.

Software as a Service

There are many code-hosting SaaS offerings: GitHub (proprietary), GitLab (open core), Pagure (FOSS) to name just a few. And while their licenses, ToS, implementations and backgrounds differ, they have a few things in common.

Benefits:

  • (sort of) centralized service
  • free (as in beer) tier available
  • high number of users (and potential collaborators)
  • high number of hosted projects
  • good (fsvo "good") connection from around the globe
  • no maintenance required from the users

Limitations:

  • dependency on the interest/goodwill of the owner to continue the service
  • some features might require signing up for a paid tier

Overall, SaaS is handy if you're lazy, just want to get the job done and benefit from others being able to easily contribute to your code.

Hosted Solutions

All of the above mentioned services also offer a hosted solution: GitHub Enterprise, GitLab CE and EE, Pagure.

As those are software packages you can install essentially everywhere, you can host the service "in your basement", in the cloud or in any data center you have hardware or VMs running.

However, with self-hosting, the above list of common things shifts quite a bit.

Benefits:

  • the service is configured and secured exactly like you need it
  • the data remains inside your network/security perimeter if you want it

Limitations:

  • requires users to create an own account on your instance for collaboration
  • probably low number of users (and potential collaborators)
  • connection depends on your hosting connection
  • infrastructure (hardware, VM, OS, software) requires regular maintenance
  • dependency on your (free) time to keep the service running
  • dependency on your provider (network/hardware/VM/cloud)

I think especially the first and last points are very important here.

First, many contributions happen because someone sees something small and wants to improve it, be it a typo in the documentation, a formatting error in the manpage or a trivial improvement of the code. But these contributions only happen when the complexity to submit it is low. Nobody not already involved in OpenStack would submit a typo-fix to their Gerrit which needs a Launchpad account… A small web-edit on GitHub or GitLab on the other hand is quickly done, because "everybody" has an account anyways.

Second, while it is called "self-hosting", in most cases it's more of a "self-running" or "self-maintaining" as most people/companies don't own the whole infrastructure stack.

Let's take this website as an example (even though it does not host any Git repositories): the webserver runs in a container (LXC) on a VM I rent from netcup. In the past, netcup used to get their infrastructure from Hetzner - however I am not sure that this is still the case. So worst case, the hosting of this website depends on me maintaining the container and the container host, netcup maintaining the virtualization infrastructure and Hetzner maintaining the actual data center. This also implies that I have to trust those companies and their suppliers as I only "own" the VM upwards, not the underlying infrastructure and not the supporting infrastructure (network etc).

SaaS vs Hosted

There is no silver bullet to that. One important question is "how much time/effort can you afford?" and another "which security/usability constraints do you have?".

Hosted for a dedicated group

If you need a solution for a dedicated group (your work, a big FOSS project like Debian or a social group like riseup), a hosted solution seems like a good idea. Just ensure that you have enough infrastructure and people to maintain it as a 24x7 service or at least close to that, for a long time, as people will depend on your service.

The same also applies if you need/want to host your code inside your network/security perimeter.

Hosted for an individual

Contrary to a group, I don't think a hosted solution makes sense for an individual most of the time. The burden of maintenance quite often outweighs the benefits, especially as you'll have to keep track of (security) updates for the software and the underlying OS as otherwise the "I own my data" benefit becomes "everyone owns me" quite quickly. You also have to pay for the infrastructure, even if the OS and the software are FOSS.

You're also probably missing out on potential contributors, which might have an account on the common SaaS platforms, but won't submit a pull-request for a small change if they have to register on your individual instance.

SaaS for a dedicated group

If you don't want to maintain an own setup (resources/costs), you can also use a SaaS platform for a group. Some SaaS vendors will charge you for some features (they have to pay their staff and bills too!), but it's probably still cheaper than having the right people in-house unless you have them anyways.

You also benefit from a networking effect, as other users of the same SaaS platform can contribute to your projects "at no cost".

Saas for an individual

For an individual, a SaaS solution is probably the best fit as it's free (as in beer) in the most cases and allows the user to do what they intend to do, instead of shaving yaks and stacking turtles (aka maintaining infrastructure instead of coding).

And you again get the networking effect of the drive-by contributors who would not sign up for a quick fix.

Selecting the right SaaS

When looking for a SaaS solution, try to answer the following questions:

  • Do you trust the service to be present next year? In ten years? Is there a sustainable business model?
  • Do you trust the service with your data?
  • Can you move between SaaS and hosted easily?
  • Can you move to a different SaaS (or hosted solution) easily?
  • Does it offer all the features and integrations you want/need?
  • Can you leverage the network effect of being on the same platform as others?

Selecting the right hosted solution

And answer these when looking for a hosted one:

  • Do you trust the vendor to ship updates next year? In ten years?
  • Do you understand the involved software stack and willing to debug it when things go south?
  • Can you get additional support from the vendor (for money)?
  • Does it offer all the features and integrations you want/need?

So, do you really want to self-host?

I can't speak for you, but for my part, I don't want to run a full-blown Git hosting just for my projects, GitHub is just fine for that. And yes, GitLab would be equally good, but there is little reason to move at the moment.

And yes, I do run my own Nextcloud instance, mostly because I don't want to backup the pictures from my phone to "a cloud". YMMV.

Building Legacy 2.0

I've recently read an article by my dear friend and colleague @liquidat about using Ansible to manage RHEL5 and promised him a nice bashingreply.

Background

Ansible, while being agent-less, is not interpreter-less and requires a working Python installation on the target machine. Up until Ansible 2.3 the minimum Python version was 2.4, which is available in EL5. Starting with Ansible 2.4 this requirement has been bumped to Python 2.6 to accommodate future compatibility with Python 3. Sadly Python 2.6 is not easily available for EL5 and people who want/need to manage such old systems with Ansible have to find a new way to do so.

First, I think it's actually not possible to effectively manage a RHEL5 (or any other legacy/EOL system). Running ad-hoc changes in a mostly controlled manner - yes, but not fully manage them. Just imagine how much cruft might have been collected on a system that was first released in 2007 (that's as old as Debian 4.0 Etch). To properly manage a system you need to be aware of its whole lifecycle, and that's simply not the case here. But this is not the main reason I wanted to write this post.

Possible solutions

liquidat's article shows three ways to apply changes to an EL5 system, which I'd like to discuss.

Use the power of RAW

Ansible contains two modules (raw and script) that don't require Python at all and thus can be used on "any" target. While this is true, you're also losing about every nice feature and safety net that Ansible provides you with its Python-based modules. The raw and script modules are useful to bootstrap Python on a target system, but that's about it. When using these modules, Ansible becomes a glorified wrapper around scp and ssh. With almost the same benefits you could use that for-loop that has been lingering in your shell history since 1998.

Using Ansible for the sake of being able to say "I used Ansible"? Nope, not gonna happen.

Also, this makes all the playbooks that were written for Ansible 2.3 unusable and widens the gap between the EL5 systems and properly managed ones :(

Upgrade to a newer Python version

You can't just upgrade the system Python to a newer verion in EL5, too many tools expect it to be 2.4. But you can install a second version, parallel to the current one.

There are just a few gotchas with that:

  1. The easiest way to get a newer Python for EL5 is to install python26 from EPEL. But EPEL for EL5 is EOL and does not get any updates anymore.
  2. Python 2.6 is also EOL itself and I am not aware of any usable 2.7 packages for EL5.
  3. While you might get Python 2.6 working, what's about all the libs that you might need for the various Ansible modules? The system ones will pretty sure not work for 2.6.
  4. (That's my favorite) Are you sure there are no (init) scripts that check for the existence of /usr/bin/python26 and execute the code with that instead of the system Python? Now see 3, 2 and 1 again. Initially you said "but it's only for Ansible", right?
  5. Oh, and where do you get an approval for such a change of production systems anyways? ;)

Also, this kinda reminds me of the "Python environment" XKCD:

XKCD: Python Environment

Use Ansible 2.3

This is probably the sanest option available. It does not require changes to your managed systems. Neither does not limit you (a lot) in what you can do in your playbooks.

If only Ansible 2.3 was still supported and getting updates…

And yet, I still think that's the sanest solution available. Just make sure you don't use any modules that communicate with the world (which includes the dig lookup!) and only use 2.3 on an as-needed basis for EL5 hosts.

Conclusion

First of all, please get rid of those EL5 systems. The Extended Life-cycle Support for them ends in 2020 and nobody even talks about support for the hardware it's running on. Document the costs and risks those systems are bringing into the environment and get the workloads migrated, please. (I wrote"please" twice in a paragraph, it must be really important).

I called this post "Building Legacy 2.0" because I fear that's a recurring pattern we'll be seeing. On the one hand legacy systems that need to be kept alive. On the other the wish (and also pressure) to introduce automation with tools that are either not compatible with those legacy systems today or won't be tomorrow as the tool develop much faster than the systems you control using them.

And by still forcing those tools into our legacy environments, we just add more oil to the fire. Instead of maintaining that legacy system, we now also maintain a legacy automation stack to pseudo-manage that legacy system. More legacy, yay.

starting the correct Chromium profile when opening links from IRC

I am using Chromium/Chrome as my main browser and I also use its profile/people feature to separate my work profile (bookmarks, cookies, etc) from my private one.

However, Chromium always opens links in the last window (and by that profile) that was in foreground last. And that is pretty much not what I want. Especially if I open a link from IRC and it might lead to some shady rick-roll page.

Thankfully, getting the list of available Chromium profiles is pretty easy and so is displaying a few buttons using Python.

To do so I wrote cadmium, which scans the available Chromium profiles and allows to start either of them, or Chromium's Incognito Mode. On machines with SELinux it can even launch Chromium in the SELinux sandbox.

No more links opened in the wrong profile. Yay!

Breaking glass, OnePlus service and Android backups

While visiting our Raleigh office, I managed to crack the glass on the screen of my OnePlus 3. Luckily it was a clean crack from the left upper corner, to the right lower one. The crack was not really interfering with neither touch nor display, so I had not much pressure in fixing it.

eBay lists new LCD sets for 110-130€, and those still require manual work of getting the LCD assembly out of the case, replacing it, etc. There are also glass-only sets for ~20€, but these require the complete removal of the glued glass part from the screen, and reattaching it, nothing you want to do at home. But there is also still the vendor, who can fix it, right? Internet suggested they would do it for about 100€, which seemed fair.

As people have been asking about the support experience, here is a quick write up what happened:

  • Opened the RMA request online on Sunday, providing a brief description of the issue and some photos

  • Monday morning answer from the support team, confirming this is way out of warranty, but I can get the device fixed for about 93€

  • After confirming that the extra cost is expected, I had an UPS sticker to ship the device to CTDI in Poland

  • UPS even tried a pick-up on Tuesday, but I was not properly prepared, so I dropped the device later at a local UPS point

  • It arrived in Poland on Wednesday

  • On Thursday the device was inspected, pictures made etc

  • Friday morning I had a quote in my inbox, asking me to pay 105€ - the service partner decided to replace the front camera too, which was not part of the original 93€ approximation.

  • Paid the money with my credit card and started waiting.

  • The actual repair happened on Monday.

  • Quality controlled on Tuesday.

  • Shipped to me on Wednesday.

  • Arrived at my door on Thursday.

All in all 9 working days, which is not great, but good enough IMHO. And the repair is good, and it was not (too) expensive. So I am a happy user of an OnePlus 3 again.

Well, almost. Before sending the device for repairs, had to take a backup and wipe it. I would not send it with my, even encrypted, data on it. And backups and Android is something special.

Android will backup certain data to Google, if you allow it to. Apps can forbid that. Sadly this also blocks non-cloud backups with adb backup. So to properly backup your system, you either need root or you create a full backup of the system in the recovery and restore that.

I did the backup using TWRP, transferred it to my laptop, wiped the device, sent it in, got it back, copied the backup to the phone, restored it and... Was locked out of the device, it would not take my password anymore. Well, it seems that happens, just delete some files and it will be fine.

It's 2017, are backups of mobile devices really supposed to be that hard?!